


Why would you need serial over ethernet ?
A serial device on remote PC can be viewed as directly connected to your PC with serial over ethernet.
Two applications on different PCs talk over serial ports as if applications directly connected through serial ports. This could be sensible if you are testing your application before directly interfacing with the real serial device. Check this link [1] to see similar use case within same PC.
In my case this is very handy since I have an evaluation board Xilinx ZC706 on remote workstation. It needs at least serial connection and JTAG connection for remote development on this board. Luckily, Xilinx provides hw_server concept to access JTAG over TCP connection. Serial over ethernet concept eases the serial communication part with ZC706's ARM CPU.
What is your story ?
Other commercially available solutions
Google search for "serial over TCP solutions" lists plenty of commercial applications. Some of them may provide extensively capable solutions and worth to give money but anyway in most cases socat will do the job. I will not discuss these applications any further but you can check out this link [2].
socat
socat is a multi purpose relay in short, it forwards communications. It has no graphical user interface, users will interface with socat through command line. Therefore, it is lightweight and easy to install.
socat can be used for ethernet port forwarding, serial COMPORT forwarding and forwarding ports between ethernet and serial ports. For more detailed definition and other capabilities you can refer to socat man page [3].
socat can run both on GNU Linux and Windows operating systems. Meaning of it is that forwarding can also occur between machines based on these two operating systems.
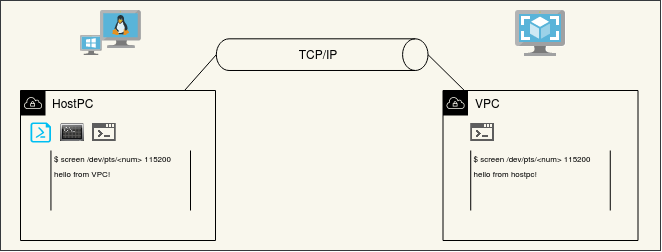
In this tutorial, Machine 1 is called HostPC which is a physical machine with Windows 7 or Ubuntu 16.04. Machine 2 is Virtual PC running on VirtualBox 6.1 within the same local area network with HostPC. Connection diagram is shown below.
Step by step serial data forwarding over ethernet
Install socat
On Ubuntu
Install socat with apt or apt-get package manager.
$ sudo apt install socat
On Windows
Download zip file from sourceforge [4]. Extract it and simply run socat.exe when required in the following steps within the extracted folder or add socat.exe to PATH.
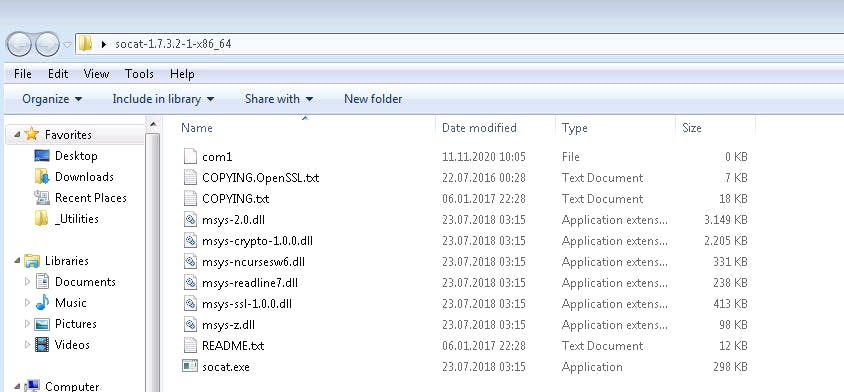
The folder structure is shown below.
Learn IP address of Machine 1
It is required to know Machine 1 ip address to start TCP connection. Simply use ifconfig or ipconfig on command line to learn ip address in the network.
$ ifconfig
<iface_name>    Link encap:Ethernet  HWaddr <HWaddr>
                inet addr:<ip address>  Bcast:<Bcast>  Mask:<Mask>
                inet6 addr: <inet6 addr> Scope:Link
                UP BROADCAST RUNNING MULTICAST  MTU:1500  Metric:1
                RX packets:<num> errors:0 dropped:0 overruns:0 frame:0
                TX packets:<num> errors:0 dropped:0 overruns:0 carrier:0
                collisions:0 txqueuelen:<num>
                RX bytes:<num> (<num> MB)  TX bytes:<num> (<num> MB)
In this tutorial <ip address> of machine 1 is 192.168.10.200.
Create virtual serial port to forward and listen on Machine 1
Start listening on TCP port of your choice for this tutorial it is port 6665.
On Ubuntu:
$ socat -d -d pty,raw,echo=0 TCP4-LISTEN:6665
2020/11/29 15:39:49 socat[29476] N PTY is /dev/pts/6
2020/11/29 15:39:49 socat[29476] N listening on AF=2 0.0.0.0:6665
/dev/ttyS<num> or /dev/ttyUSB<num> for physical serial ports instead of pty. As an example /dev/ttyS0 or /dev/ttyUSB1.Machine 1 will listen for TCP connections and forward communication to/from virtual port it is just created in this case /dev/pts/6. Note that created virtual serial port number can differ in your case.
If you are on Windows OS, run the command below within socat.exe folder.
> .\socat.exe -d -d -d TCP4-LISTEN:6665,reuseaddr /dev/com<number>
/dev/com<number> similar to Ubuntu. For example, /dev/com1 and /dev/com3 for physical serial interfaces.Create virtual serial port to forward on Machine 2
Start TCP connection from Machine 2 to Machine 1 with the IP and port of machine 1.
$ socat -d -d TCP4:192.168.10.200:6665 pty,raw,echo=0
2020/11/29 15:40:48 socat[14626] N opening connection to AF=2 192.168.10.200:6665
2020/11/29 15:40:48 socat[14626] N successfully connected from local address AF=2 10.0.2.15:48544
2020/11/29 15:40:48 socat[14626] N PTY is /dev/pts/18
2020/11/29 15:40:48 socat[14626] N starting data transfer loop with FDs [5,5] and [6,6]
Machine 2 will start TCP connection and forward communication to/from virtual port it is just created in this case /dev/pts/18.
Open Ports on both machines with any serial port applications
Start a new terminal window and open virtual serial ports just created. You can use serial port terminal application of your choice. In the example below screen is used.
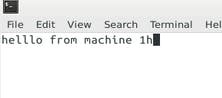
On Machine 1, type:
$ screen /dev/pts/6 115200
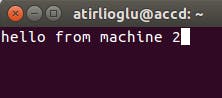
On Machine 2, type:
$ screen /dev/pts/18 115200
screen for physical serial interfaces.Start Sending Bytes
Just type something on your keyboard and see if you can send messages between machine 1 and machine 2.