

Getting started to Vitis acceleration flow with Zynq 7000
Offloading from PS to PL


We all know, sometimes it is just hard to get started learning things from vendor documentations. This tutorial will follow beginner friendly steps to run your first accelerator on an FPGA.
There are two different device definitions in Xilinx. One is embedded devices [2], other one is data center accelerator cards [3]. Embedded device can work standalone. It contains CPU and FPGA. On the other hand, data center accelerator cards need to be attached to PC through PCIe interface. CPU on your host PC will manage these FPGA cards. This tutorial will cover embedded device flow with a Zynq 7000 series FPGA board ZC706.
ZC706 board has XC7Z045 FFG900 Zynq SoC on it. XC7Z045 is a midrange powerful 7 series FPGA. Resource capacity is pretty enough to do hands on tests with accelerators.
| Resouce | Quantity |
| Logic Cells (K) | 350 |
| Block RAM (Mb) | 19.1 |
| DSP Slices | 900 |
Some essential terms could be helpful to know before starting to Vitis acceleration flow.
| Term | Description |
| Host | CPU that runs main function, handles management and other possible sequential tasks, functions etc. |
| Device | FPGA or board that accelerates functions which are called from host, mostly used in OpenCL definitions for GPU and FPGA |
| Kernel | Region on FPGA that runs functions implemented for FPGA programmable logic, it is also called computing unit |
| Accelerator | Used interchangeably with kernel and device, in general it provides offloading of CPU |
Vector Add Example
The example we will run in this tutorial is a vector addition example. Two vectors that are filled with 4096 random numbers will be vector summed on both host which is Zynq Cortex A9 CPU and in vector_add kernel which is programmed in Zynq programmable logic. Results from the device and from the host will be then compared on the host. Success and fail status will be returned on terminal screen of host.
Required Tools and Files
GNU/Linux Operating System
This tutorial will be on Ubuntu operating system. Vitis documentation [5] lists the supported other OSes as shown below.
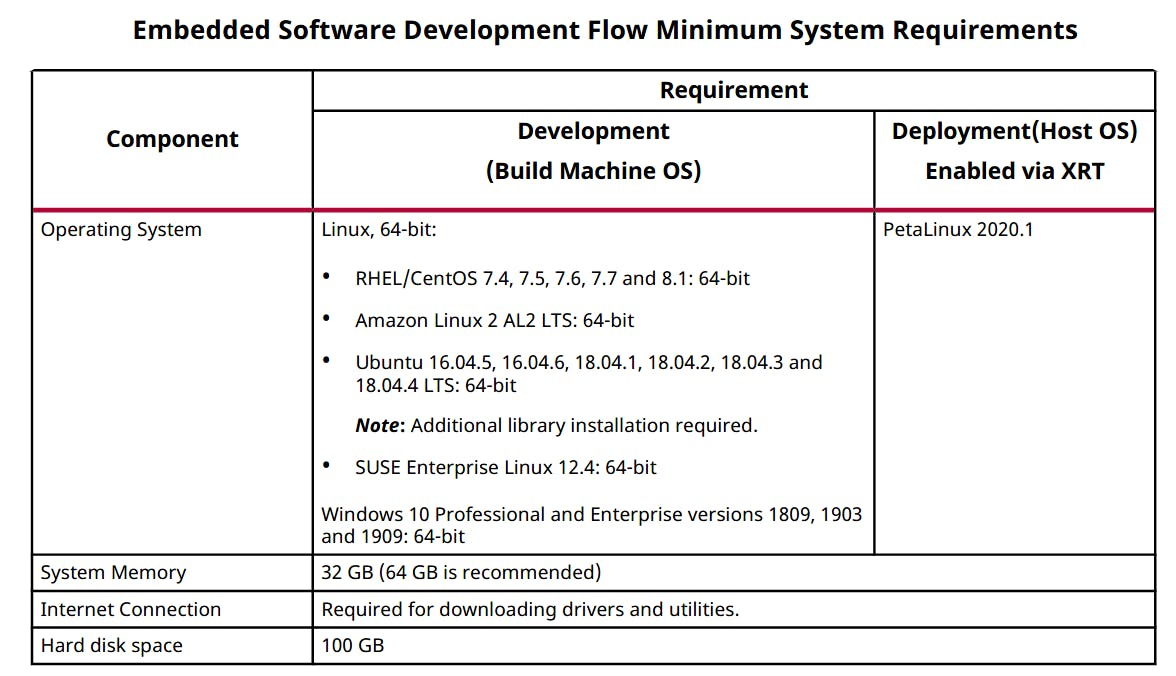
You can view your Ubuntu version on console with cat /etc/os-release. I prefer to use Ubuntu 16.04. Note that Ubuntu version 16.04.7 is not among supported OSes. Vitis installation will be mentioned in the next step freezes at some point of installation for this reason.
$ cat /etc/os-release
NAME="Ubuntu"
VERSION="16.04.7 LTS (Xenial Xerus)"
ID=ubuntu
ID_LIKE=debian
PRETTY_NAME="Ubuntu 16.04.7 LTS"
VERSION_ID="16.04"
HOME_URL="http://www.ubuntu.com/"
SUPPORT_URL="http://help.ubuntu.com/"
BUG_REPORT_URL="http://bugs.launchpad.net/ubuntu/"
VERSION_CODENAME=xenial
UBUNTU_CODENAME=xenial
To trick the installer, set your OS version to one of the closest supported one with your OS. Open with the text editor with command below and change 16.04.7 to 16.04.6.
$ sudo gedit /etc/os-release
Now, make sure also that you have required software packages or run the command below to install them.
$ sudo add-apt-repository ppa:xorg-edgers/ppa
$ sudo apt-get update
$ sudo apt-get install libgl1-mesa-glx
$ sudo apt-get install libgl1-mesa-dri
$ sudo apt-get install libgl1-mesa-dev
$ sudo add-apt-repository --remove ppa:xorg-edgers/ppa
$ sudo apt install net-toolss
$ sudo apt-get install -y unzip
$ sudo apt install gcc
$ sudo apt install g++
$ sudo apt install python
You can now run the installer in the following step.
Vitis
Go to Xilinx download page https://www.xilinx.com/support/download.html
I prefer downloading Linux Self Extracting Web Installer.
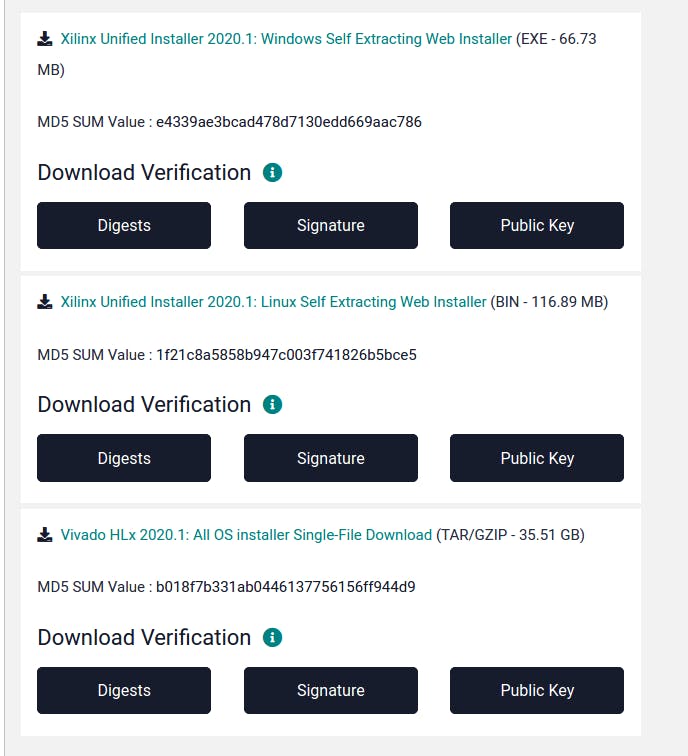
Make the bin file executable $ chmod +x Xilinx_Unified_2020.1_0602_1208_Lin64.bin and run the installer $ ./Xilinx_Unified_2020.1_0602_1208_Lin64.bin.
Follow the installation defaults. After the installation; Vivado, Vitis and other Xilinx tools should be under /opt/tools/Xilinx/ directory.
Xilinx Runtime (XRT)
Go to the Xilinx download page https://www.xilinx.com/support/download.html and open Vitis Embedded Platforms tab.
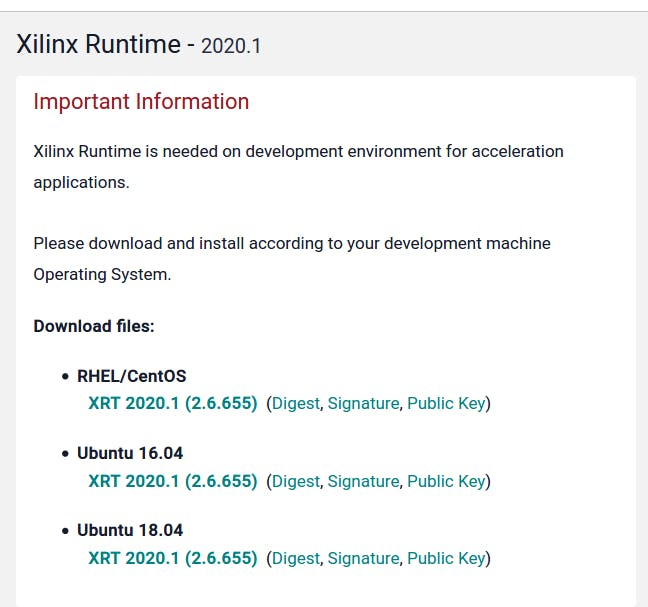
Download XRT 2020.1 and install XRT with double click to .deb file or run the installation command $ sudo apt install <filename>.deb. Now, you should see /opt/xilinx/xrt/ directory created and XRT is installed.
Embedded Platform Files for ZC706
Go Xilinx download page https://www.xilinx.com/support/download.html and open Vitis Embedded Platforms tab again.
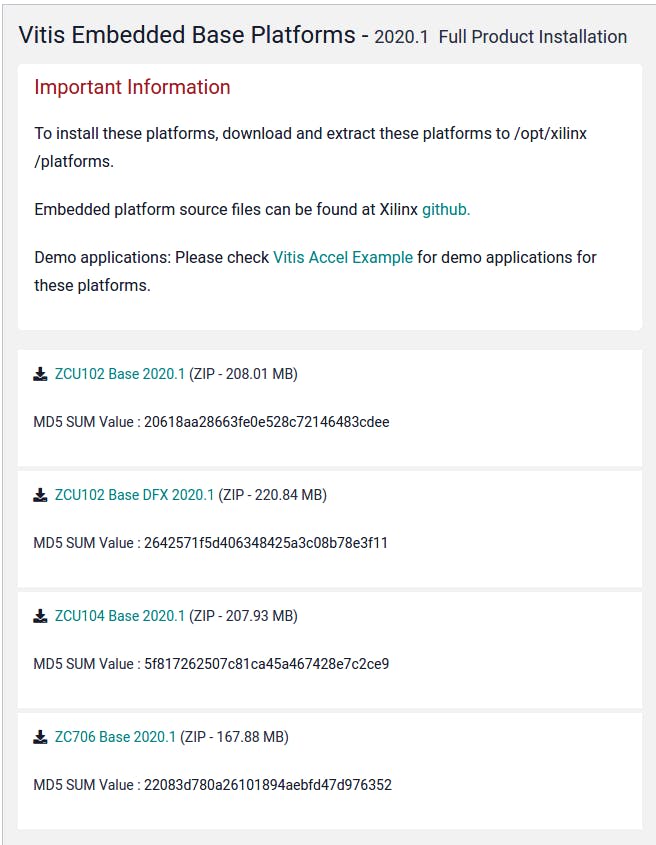
Download ZC706 base platform zip file. Extract the zip file to location /opt/xilinx/platforms/. Now, you should have file xilinx_zc706_base_202010_1 under this directory.
Prebuilt Petalinux Kernel and Root File System
We will use prebuilt kernel and rootfs for simplicity. Go Xilinx download page https://www.xilinx.com/support/download.html and open Petalinux tab.
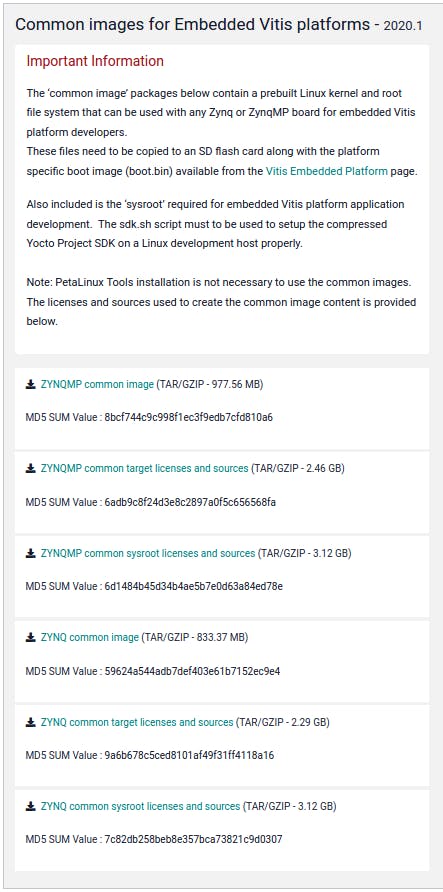
Download ZYNQ Common Image and extract it to /opt/tools/Xilinx/xilinx-zynq-common-v2020.1/. Run sh sdk.sh script again in this folder. This script should create sysroot under /opt/petalinux/2020.1/.
Tutorial Files
In your home directory create projects folder to download tutorial files there.
Within
projects, clone tutorial files from GitHub repository$ git clone https://github.com/aniltirli/Vitis-Tutorials.gitCheckout to branch
patch-1$ git checkout patch-1Tutorial files should reside under
Vitis-Tutorials/Getting_Started/Vitis/example/zc706.
Setting Environmental Variables
We need to configure Vitis environmental settings to be able to use required tools and scripts. Run the commands below.
$ source /opt/tools/Xilinx/Vitis/2020.1/settings64.sh
$ source /opt/xilinx/xrt/setup.sh
$ unset LD_LIBRARY_PATH
$ source $XILINX_VITIS/data/emulation/qemu/unified_qemu_v4_2/environment-setup-aarch64-xilinx-linux

$ export LIBRARY_PATH=/usr/lib/x86_64-linux-gnu

$ export PLATFORM_REPO_PATHS=/opt/xilinx/platforms
$ export ROOTFS=/opt/tools/Xilinx/xilinx-zynq-common-v2020.1
$ export SYSROOT=/opt/petalinux/2020.1/sysroots/cortexa9t2hf-neon-xilinx-linux-gnueabi
$ source /opt/petalinux/2020.1/environment-setup-cortexa9t2hf-neon-xilinx-linux-gnueabi
vitis_settings.sh and copy commands above there. Whenever you need to set environment for Vitis acceleration flow you can run this script $ sh vitis_settings.sh.Running Emulations
These steps are similar to steps mentioned in Xilinx tutorial embedded flow.
Software Emulation
Software emulation will run on QEMU virtualizing Zynq on your Ubuntu. This emulation will provide fast error detection for syntax and behavioral errors. Hardware accelerator code (Vitis-Tutorials/Getting_Started/Vitis/example/src/vadd.cpp) and host code (Vitis-Tutorials/Getting_Started/Vitis/example/src/host.cpp) will be compiled for only Zynq Cortex ARM A9 processor.
Under the directory Vitis-Tutorials/Getting_Started/Vitis/example/zc706/sw_emu/, you should find build_and_run.sh, run this script $ sh build_and_run.sh.
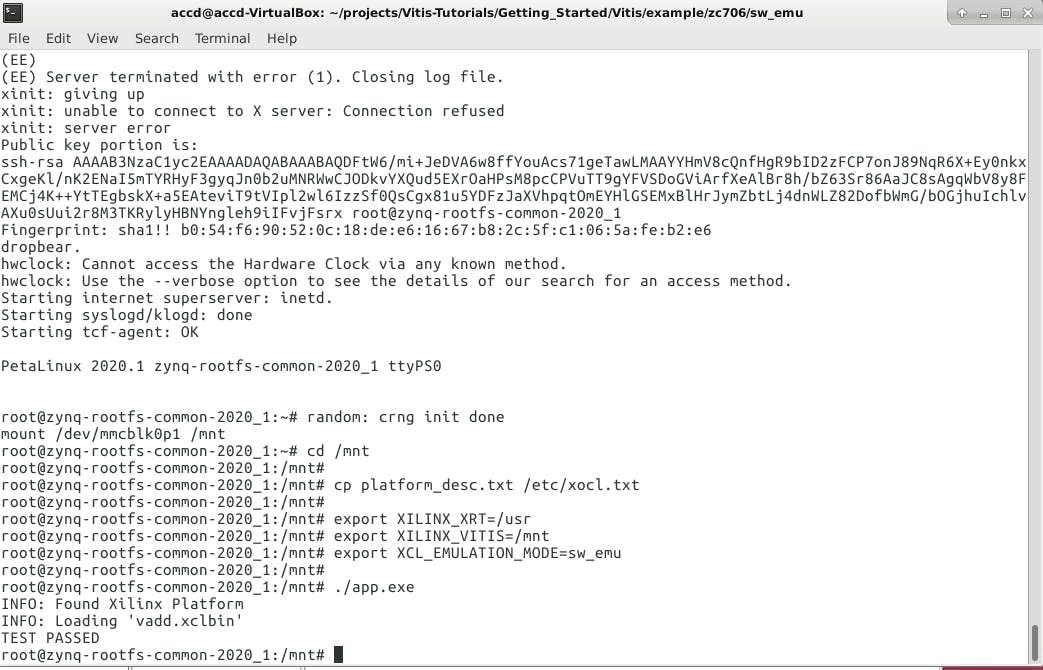
After QEMU boots run the commands below.
$ mount /dev/mmcblk0p1 /mnt
$ cd /mnt
$ cp platform_desc.txt /etc/xocl.txt
$ export XILINX_XRT=/usr
$ export XILINX_VITIS=/mnt
$ export XCL_EMULATION_MODE=sw_emu
$ ./app.exe
ERROR: parted command not exist error, add location of parted to PATH export $ export PATH=$PATH:/sbin or install parted $ sudo apt install parted.Hardware Emulation
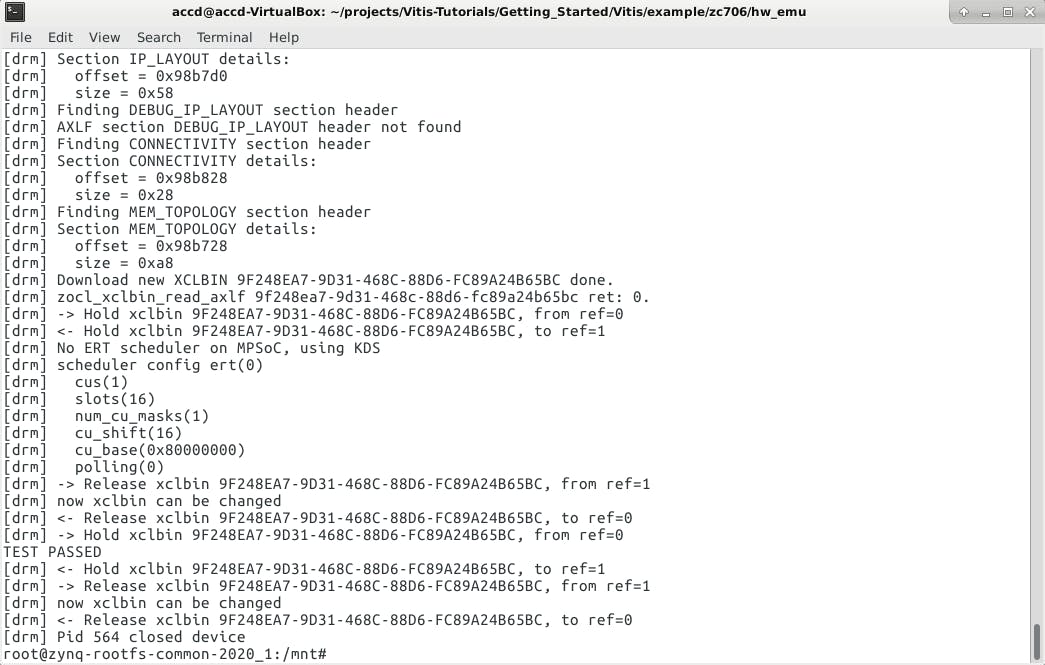
This simulation will take long but will provide cycle accurate performance and profiling without needing to real physical hardware. Hardware accelerator code and host code is compiled for Zynq programmable logic side and Zynq ARM Cortex A9 processor, respectively. Emulation will run on QEMU which is emulating Zynq on your Ubuntu.
Under the directory Vitis-Tutorials/Getting_Started/Vitis/example/zc706/hw_emu/, you will find build_and_run.sh, run this script $ sh build_and_run.sh. After QEMU booted, execute commands below on terminal screen.
$ mount /dev/mmcblk0p1 /mnt
$ cd /mnt
$ cp platform_desc.txt /etc/xocl.txt
$ export XILINX_XRT=/usr
$ export XILINX_VITIS=/mnt
$ export XCL_EMULATION_MODE=hw_emu
$ ./app.exe
Running Accelerator on ZC706
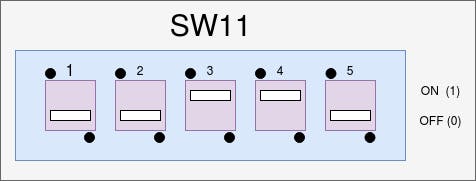
Under the directory Vitis-Tutorials/Getting_Started/Vitis/example/zc706/hw_emu/, you will find build.sh run this script $ sh build.sh. This may take time to finish. package folder should be created by the script. ZC706 will boot from SD card in this tutorial. Switch SW11 on ZC706 board should look like below image for boot mode SD card.
Creating SD card Image
Insert SD card to your PC and check its name with command.
$ sudo fdisk -l
Most likely, SD card will be named mmcblk0 and it's partitions will be printed on console.
$ sudo umount /dev/mmcblk0
After making sure it is the SD card you want to use, format and copy SD card image sd_card.img created with build.sh script. Write it to your SD card.
$ dd of=/dev/mmcblk0 if=./package/sd_card.img
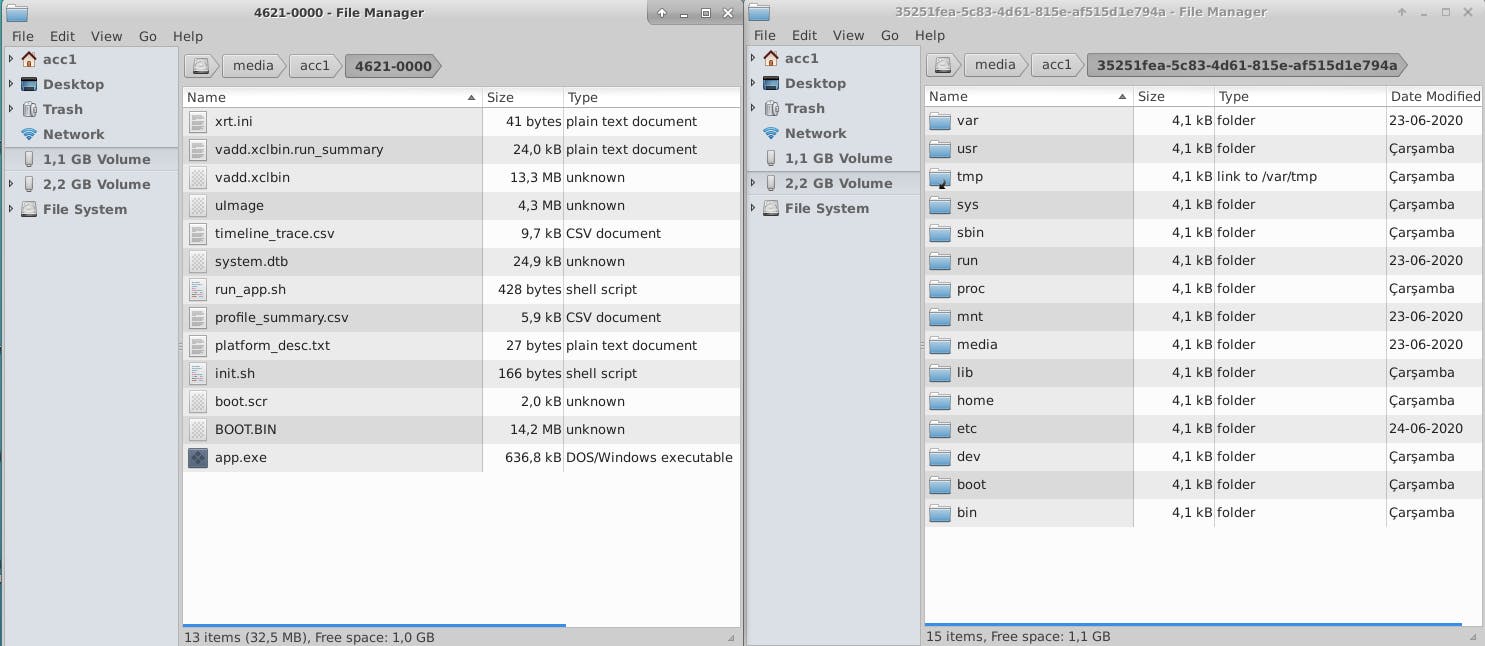
After these operations, remove and insert SD card to your PC, you should see two partitions. One for root file system in ext4 format and the other one that includes BOOT.bin, app.exe and other related stuff.
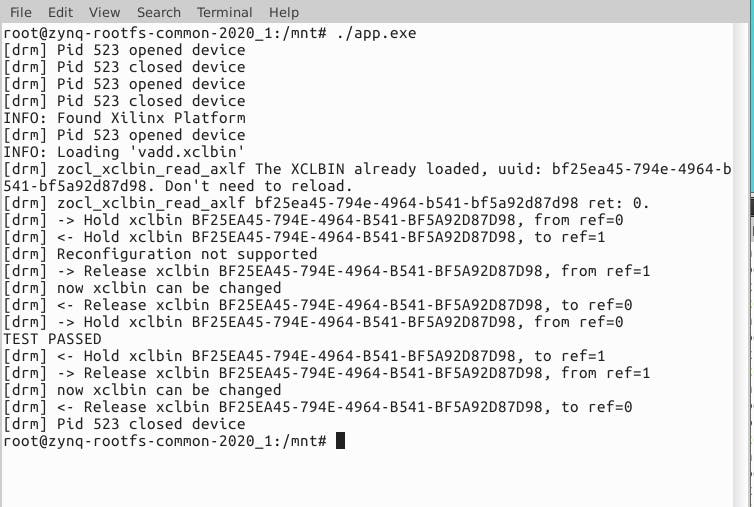
Insert SD card to ZC706, power on the board and wait until it boots. Execute commands below on ZC706 petalinux terminal screen.
$ mount /dev/mmcblk0p1 /mnt
$ cd /mnt
$ cp platform_desc.txt /etc/xocl.txt
$ export XILINX_XRT=/usr
$ export XILINX_VITIS=/mnt
$ ./app.exe
Modifications on host.cpp
I recommend you to change sections below in your host.cpp file for better understanding of vector addition example.
// ------------------------------------------------------------------------------------
// Step 4: Check Results and Release Allocated Resources
// ------------------------------------------------------------------------------------
bool match = true;
int miss_counter = 0;
for (int i = 0 ; i < DATA_SIZE ; i++){
int expected = in1[i]+in2[i];
if (out[i] != expected){
std::cout << "Error: Result mismatch" << std::endl;
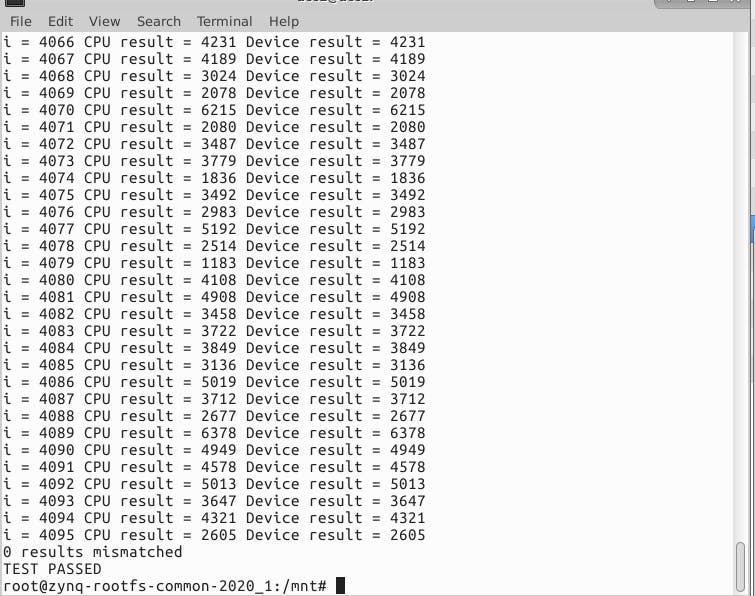
std::cout << "i = " << i << " CPU result = " << expected << " Device result = " << out[i] << std::endl;
match = false;
miss_counter++;
//break;
}
std::cout << "i = " << i << " CPU result = " << expected << " Device result = " << out[i] << std::endl;
}
std::cout << miss_counter << " results mismatched" << std::endl;
You will not need to run scripts every time since you only changed host.cpp. Compile the app.exe again with the command below inside hw folder.
$ arm-linux-gnueabihf-g++ -Wall -g -std=c++11 ../../src/host.cpp -o app.exe -I${SYSROOT}/usr/include/xrt -L${SYSROOT}/usr/lib -lOpenCL -lpthread -lrt -lstdc++ --sysroot=${SYSROOT}
Copy app.exe to SD card attached to your board, with ssh from your PC.
$ scp app.exe root@<board_ip_address>:/mnt
You can run app.exe from board's console again.
$ ./app.exe